- 사용자가 usernames, passwords, 그리고 기타 개인적인 정보를 가지고 특정 서비스에 저장된 자신의 데이터를 다른 서비스에서 접근할 수 있도록 허락해주는 프로토콜
- e.g. 구글의 서비스에서 관리되고 있는 사용자의 데이터를 다른 서비스가 접근할 수 있도록 구글 API를 제공
특징
- 여러 장치를 통해 시시각각 바뀌는 사용자의 연락처 정보를 실시간으로 업데이트 받을 수 있음
- 타 서비스에 저장된 사용자 데이터를 접근해도 되는지 사용자에게 명시적으로 허락을 받음
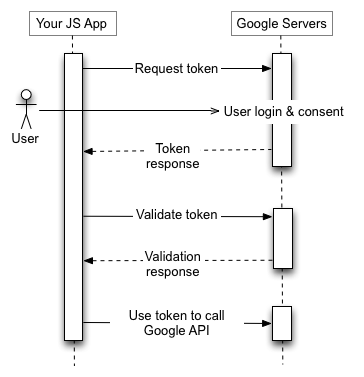
OAuth 2.0 flow for JavaScript: implicit grant flow
- Implicit Grant
- 자바스크립트 라이브러리로 개발되는 SPA에서는 implicit grant 방식이 많이 사용됨
- user가 present 할 때만 API에 접근 가능하며, 기밀 정보는 따로 저장되지 않음
- 사용자는 API를 제공받고자 하는 서비스에 로그인 한 후, API를 사용하고자 하는 어플리케이션에서 요청하는 권한을 확인하고, 해당 권한을 허용한다.
- Google Authorization Server는 사용자를 사전에 등록된
redirect uri로 리다이렉트 시키면서access token을 애플리케이션에 보낸다. - 어플리케이션은 이
access token을 이용해서 구글 API를 호출하여 원하는 정보를 얻는다.
Workflow
- Request : 클라이언트 어플리케이션은 Google Authorization Server에
access token을 요청하고, - Response : response로부터
token을 추출한다. - Validation : 이후 접근하고자 하는 Google API에
token을 보낸다.
Example: Google People API
구글 API를 호출하기 위해서는 가장 먼저, 구글에 API를 사용하고자 하는 어플리케이션을 클라이언트로 등록하고
client_id를 발급받아야 한다.- 구글 API 콘솔 에서 프로젝트를 생성 → 사용자 인증 정보 만들기 에서 OAuth 클라이언트 ID를 선택 → 웹 어플리케이션 → 승인된 리디렉션 URI 설정 (e.g.
[http://localhost:3000/](http://localhost:3000/)) → 클라이언트 ID 생성
- 구글 API 콘솔 에서 프로젝트를 생성 → 사용자 인증 정보 만들기 에서 OAuth 클라이언트 ID를 선택 → 웹 어플리케이션 → 승인된 리디렉션 URI 설정 (e.g.
Google Authorization Server에 접속하여 사용자
token을 받아야 한다.CLIENT_ID: 위에서 발급받은 클라이언트 IDAUTHORIZE_URI: 구글에서 OAuth를 제공하는 기본 URIqueryStr: 위AUTHORIZE_URI에 붙일 사용자 개인 정보 (쿼리), URL 생성용client_idredirect_uri: 실습 애플리케이션은 페이지가 하나 밖에 없는 SPA이기 때문에, 현재 URL을redirect_uri로 설정response_type: 어떤 OAuth 방식을 사용하는지를 결정하는 속성으로,token으로 설정하면 implicit grant 방식이 적용scope: 사용자의 어떤 데이터와 어떤 작업에 대한 권한을 요청하는지, 즉 어떤 구글 API를 요청하는지
loginUrl:AUTHORIZE_URI에queryStr을 붙여 만든 구글 로그인 authorization URL
1
2
3
4
5
6
7
8
9
10
11
const CLIENT_ID = "YOUR CLIENT ID";
const AUTHORIZE_URI = "https://accounts.google.com/o/oauth2/v2/auth";
const queryStr = qs.stringify({
client_id: CLIENT_ID,
redirect_uri: window.location.href,
response_type: "token",
scope: "https://www.googleapis.com/auth/contacts.readonly"
});
const loginUrl = AUTHORIZE_URI + "?" + queryStr;Google Authorization Server가
redirect URI로access token을 보내주면, 이를 이용해 token validation을 진행한다.- access token은 redirect uri의 hash 부분에 포함되므로, DOM의 Location API인
window.location.hash를 이용해 가져온다. - 만약 access token이 없을 경우, grant server URL로 이동한다.
1
2
3
4
5
6
const { access_token } = qs.parse(window.location.hash.substring(1));
if (!access_token) {
window.location.assign(loginUrl);
return null;
}- access token은 redirect uri의 hash 부분에 포함되므로, DOM의 Location API인
access token을 이용해 구글 API를 호출한다.
Bearer문자열을access token앞에 붙여Authorization header로 넘긴다.
1
2
3
4
5
6
7
8
9
const PEOPLE_URI = "https://people.googleapis.com/v1/contactGroups";
useEffect(() => {
fetch(PEOPLE_URI, {
headers: { Authorization: "Bearer " + access_token }
})
.then((res) => res.json())
.then((data) => setContactGroups(data.contactGroups));
}, [access_token]);
전체 코드
qs
npm 패키지: A querystring parsing and stringifying library with some added security.
1 | import React, { useState, useEffect } from "react"; |
Reference
OAuth 2.0 Flow: Client-side web apps | YouTube Data API
- OAuth 2.0 프로토콜 문서
Using OAuth 2.0 to Access Google APIs | Google Identity
- OAuth 2.0 JavaScript 문서
OAuth 2.0 for Client-side Web Applications | Google Identity
- Google People API 문서